


Replacing an image in Canva takes about two seconds when it works. Drag the new one over the old one and it swaps.
The problem is that it does not always behave the same way. Sometimes the new image snaps perfectly into place. Sometimes it lands beside the old one. Sometimes nothing happens at all.
That inconsistency is not a bug. Canva treats four different things as images, and each one handles replacement differently.
Once you know which of the four you are looking at, the whole thing becomes predictable. So here is the mental model first, then the method for each case.
The Four Things Canva Calls an Image
This is the part almost no guide explains, and it accounts for nearly every problem people hit.
A plain image element. A photo sitting on the canvas with nothing containing it. You can move it, resize it and rotate it freely.
An image inside a frame. A frame is a shaped container that crops whatever you put in it. Canva's own documentation calls frames placeholders you drag media into.
That word placeholder is the key. The frame is the object, and the image is its contents.
An image inside a grid. A grid is similar but built for layout, holding several images in cells with even spacing. Grids also resize more freely than frames, since they do not have to keep a fixed shape.
A background image. This is attached to the page rather than sitting on it. It is locked in position so you can build on top of it without knocking it around.
Replacement behaves differently in each case because you are doing a different operation. Swapping an element, filling a container, or changing a page property are three different things wearing the same name.
Method One: The Standard Swap
This covers most situations and it is the fastest route.
Open your design and find the image you want to change.
In the left panel, open Uploads for your own files, or Elements to search Canva's library.
Drag the new image from that panel and hover it directly over the old one. Wait for the highlight to appear around the target.
Release. The new image takes the old one's position, size, rotation and crop.
The highlight is the part people miss. If you release before it appears, Canva treats the drop as adding a new element rather than replacing one, which is why images sometimes land beside the original instead of on it.
If that happens, undo immediately with Control and Z on Windows or Command and Z on Mac, then try again more slowly.
Method Two: Replacing Inside a Frame
Frames behave slightly differently, and understanding why saves a lot of fiddling.
Drag your new image over the frame and release when the highlight appears. The image snaps into the frame's shape automatically, whether that shape is a circle, a phone mockup or a letter.
You are not replacing the frame. You are filling it, which is why the shape stays identical no matter what you drop in.
To adjust what is visible inside, double click the image. Handles appear at the corners for resizing, and you can drag the image around within the frame to reposition it. Select Done when it looks right.
Canva's guide to using frames covers the container behavior in more depth if you want the full picture.
One thing worth knowing. If you want the image out of the frame entirely rather than swapped, right click and detach it. That converts it back into a plain element you can move anywhere.
Method Three: Replacing Inside a Grid
Grids work almost identically, with one useful difference.
Drag the new image over the specific cell you want to change and release when it snaps in. Only that cell changes, which is what makes grids useful for photo collages.
Double click to reposition or resize the image within its cell, exactly as with frames.
The difference is flexibility. A grid can be stretched and resized more freely than a frame, since it is a layout tool rather than a fixed shape. If you find yourself fighting a frame's proportions, a grid is often the better container.
Method Four: Replacing a Background
Backgrounds cause the most confusion, because they are attached to the page rather than sitting on it.
Often a straight drag and drop works. Drag the new image over the page and it takes over as background.
When it does not, the fix is to detach first. Right click the background and choose the option to detach it from the background. That turns it into a normal image element you can select and delete.
Then drag your new image onto the canvas, right click it, and set it as the background.
That two step route works every time, so it is worth defaulting to when the quick method misbehaves.
Method Five: Replacing One Image Across Every Design
This one is a genuine time saver and most people never find it. It is a paid feature.
Go to Projects from the Canva homepage and filter by Images.
Find the image you want to change, and Canva shows you every design that uses it.
Select the specific designs you want updated, or choose all of them, then continue and upload the replacement.
Review the preview and confirm.
If you have ever rebranded and had to open forty templates to swap a logo, this is the feature you wanted. It is worth checking before you start clicking through designs manually.
What Carries Over, and What Bites You
Here is the detail that causes the ugliest surprises.
When you replace an image, Canva preserves the container's properties. Position, size, rotation and crop all stay.
Most applied effects carry over too. Filters, brightness adjustments and similar settings persist onto the new image.
That is usually convenient and occasionally wrong. A filter tuned for a dark photo can look terrible on a bright one. A background removal applied to the previous image does not translate meaningfully to a different subject.
So after any replacement, glance at the toolbar and check what is still applied. If the new image looks oddly washed out or oversaturated, an inherited filter is the usual culprit rather than the file itself.
Clearing the effect and reapplying takes a few seconds and avoids a lot of confused re uploading.
The Alt Text Nobody Checks
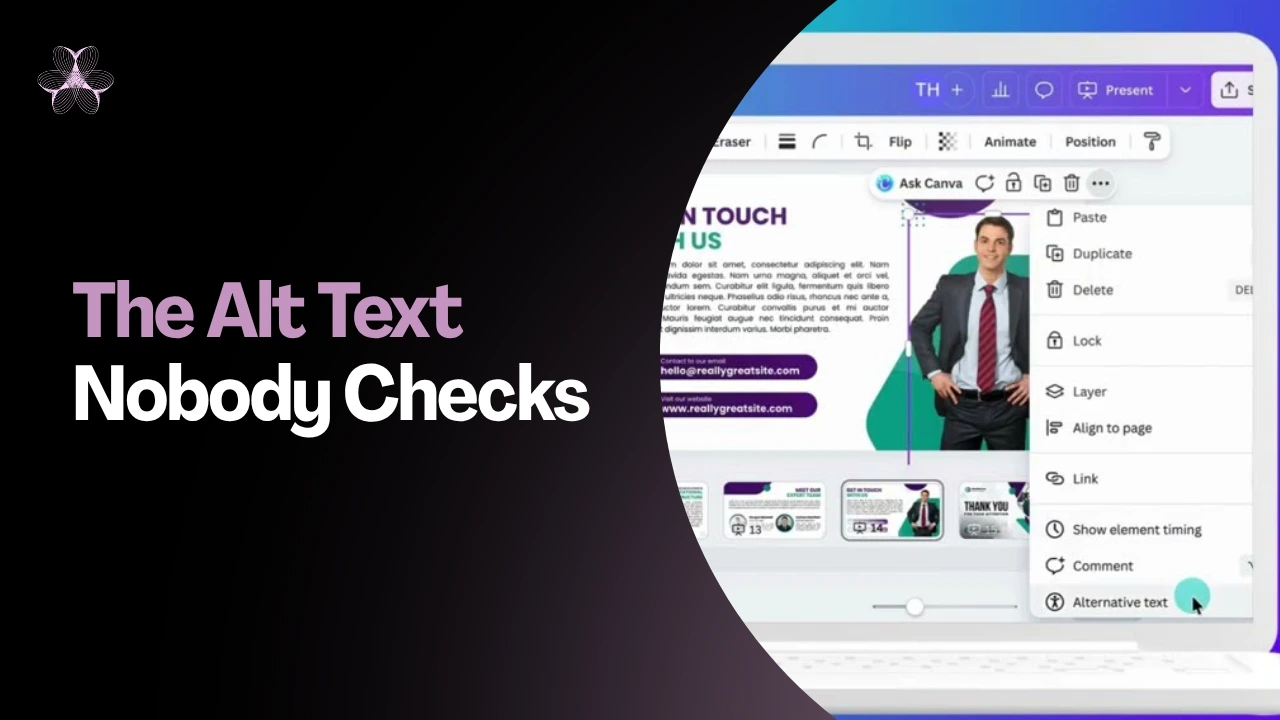 This one matters if your designs end up on a website, and I have not seen it raised in any guide on replacing images.
Canva lets you attach alternative text to an image, describing it for screen readers. Select the element, open the more options menu or right click, then choose Alternative Text.
You get up to 250 characters, plus a Mark as decorative option for images carrying no meaning.
Here is the catch. Alt text is a property of the element, and replacing an image swaps the contents of that element rather than creating a new one.
So after a swap, check whether the description still matches what is actually there. A design describing a photo you removed last week is worse than one with no description at all, because a screen reader will read it out with total confidence.
Canva's Design Accessibility tool will flag images missing alt text, which makes auditing a finished design quick. It cannot tell you that existing alt text has become wrong, so that check stays manual.
One limitation worth knowing while you are here. Canva notes that some formats, including PNG, do not carry alt text capabilities. If accessibility matters for your output, that affects which export format you choose.
The Resolution Trap
This one only reveals itself at export, which is the worst time to discover it.
The frame keeps its dimensions when you swap images. So if the original was a large photo and the replacement is small, Canva stretches the smaller file to fill the same space.
On screen at editing zoom, that often looks acceptable. Exported at full size or sent to print, it does not.
Check the pixel dimensions of a replacement before dropping it in, particularly for anything going to print. As a rough guide, a replacement should be at least as large as the one it is replacing.
The same principle applies whenever software resizes an image on your behalf.
It came up repeatedly when I compared PDF editors for Mac, where export resolution decided whether a document looked professional or amateur.
If all you have is a small or low-quality copy and you need to track down the original or a higher-resolution version, reverse image search is the fastest way to find it these Google Lens alternatives cover the tools built for exactly that job.
Replacing Images in a Template
Templates deserve their own note, since that is where most people meet this problem for the first time.
Almost every Canva template is built from frames and grids rather than loose images. That is deliberate, because it makes the template reusable.
So when you open a template and drag your photo over the stock image, it snaps into the existing shape and keeps the layout intact. That is the system working exactly as designed.
The frustration usually comes from wanting a different shape rather than a different picture. The template gives you a circle and your product photo is a wide rectangle.
You have two options there. Adjust what is visible by double clicking and repositioning inside the frame, which keeps the design consistent.
Or delete the frame entirely and place your image as a plain element, which gives you freedom at the cost of the layout the template was built around.
I would try the first before reaching for the second. Templates look good largely because of their proportions, and pulling images out of frames is the quickest way to lose that.
Undoing a Swap After You Have Closed the Design
Undo covers the moment. It does not help when you replaced something three days ago and now want it back.
For that there is version history, reached through the File menu inside the editor.
The commonly repeated claim is that Canva keeps thirty days of history.
Canva's own version history documentation says otherwise, describing up to 1,000 previous versions with no time limit on how long they are kept.
You need to be the design owner or have edit access. Viewers and commenters cannot see it, and it is a paid plan feature rather than a free one.
One caveat from people who rely on it. Minor edits, or several edits made in quick succession, do not always generate a separate saved version. So the exact state you want may not exist as its own entry.
That makes version history a safety net rather than a workflow.
If you are testing several image options for a client, duplicate the page and try them side by side. That gives you a real comparison and a real record, which history alone will not.
When Nothing Happens at All
A short troubleshooting list, in the order I would work through it.
The highlight never appeared. Drag more slowly and hover longer directly over the target before releasing.
The element is locked. Locked items reject changes silently. Select it and check the toolbar for a lock icon, then unlock it.
It is part of a group. Grouped elements sometimes intercept the drop. Ungroup, replace, then regroup.
It is a background. Use the detach method above rather than fighting the direct drop.
You are on mobile. Touch dragging is less precise. Tap the image first to select it, then look for a replace option in the toolbar rather than dragging.
If a specific design keeps resisting all of these, duplicate the page and try on the copy. Occasionally a single element gets into a strange state, and duplicating clears it faster than diagnosing it.
A Faster Habit for Repeat Work
If you replace images regularly, two small changes save real time.
Upload everything you might need before you start editing, rather than mid flow. Having your files already in the Uploads panel turns each swap into one drag instead of a detour.
And build with frames deliberately rather than placing loose images. A design made from frames is a design you can restyle in minutes later, because every image slot is already a defined container waiting for new contents.
That is the underlying logic of the whole system. Canva is not really swapping pictures. It is filling containers, and designs built with that in mind are far easier to update.
Frequently Asked Questions
How do I replace an image in Canva quickly?
Drag the new image from Uploads over the old one, wait for the highlight, then release. It keeps the original position and size.
Why is my new image not replacing the old one?
You likely released before the highlight appeared, so Canva added it as a separate element. Undo and drop again more slowly.
How do I replace an image inside a frame?
Drag the new image over the frame until it highlights. It snaps into the frame's shape automatically.
How do I change a background image?
Right click the background and detach it, delete it, then add your new image and set that as the background.
Can I replace one image across several designs?
Yes, through Projects on a paid plan. Canva lists every design using that image and updates the ones you select.
Do filters carry over to the replacement?
Usually yes. Check the toolbar afterward, since an inherited filter can look wrong on a different photo.
Why does my replaced image look blurry?
The frame kept its size and stretched a smaller file to fill it. Use a replacement at least as large as the original.
Can I undo a replacement?
Yes. Control and Z on Windows, Command and Z on Mac, immediately after the swap.
The Short Version
Drag the new image over the old one and wait for the highlight before releasing. That covers most cases.
If it is in a frame or grid, the image fills the container rather than replacing it, so the shape stays and you adjust the contents by double clicking.
If it is a background, detach it first and set the new one deliberately.
And check two things afterward every time. Whether an old filter came along, and whether the new file is large enough for how it is being displayed.
Those two checks take five seconds and prevent almost every problem people run into after the swap looks fine on screen.